From this manual how to remove wing, does not state door needs to be removed as long as you can access them nor the side sills unless its a votex then that will have to come off the side and front.
 Audi Workshop Manuals
[PREV PAGE] [NEXT PAGE]
Audi Workshop Manuals
[PREV PAGE] [NEXT PAGE]
 A2
Body > General body repairs, exterior > Body front > Body - front > Wing panel (front) - exploded view
A2
Body > General body repairs, exterior > Body front > Body - front > Wing panel (front) - exploded view
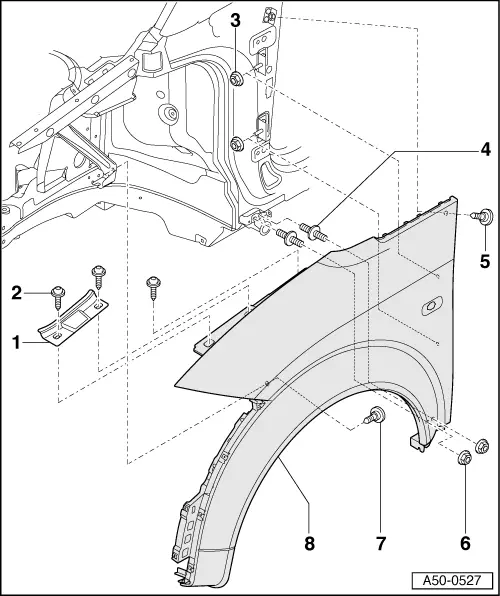
Wing panel (front) - exploded view
1 - Guide
2 - Bolt with washer
q 4 Nm
3 - Hexagon bolt
q 4 Nm
4 - Flange bolt
q Screw in or out as required for lateral adjustment.
q When tightening the nuts, use an Allen key to secure the flange bolts to prevent them turning.
5 - Bolt with washer
q 4 Nm
6 - Hexagon nut
q 4 Nm
7 - Bolt with washer
q 4 Nm
8 - Wing panel
q Removing:
– Remove bumper
→ Chapter.
– Remove wheel housing liner
→ Chapter.
– Unscrew bolts
→ Item,
→ Item and
→ Item.
– Unscrew nuts
→ Item and
→ Item.
– Detach wing from brackets on A-pillar.
Body > General body repairs, exterior > Body front > Body - front > Wing panel (front) - exploded view
[PREV PAGE] [NEXT PAGE]
So item 8 above. Although does not mention remember disconnect or remove side repeater indicator...
I believe the lower black part that wraps around the bottom of the front bumper is a part of the wing. Pretty sure only the rear arches are detachable .
Paint codes unfortunately can't help you there but someone will be along with the knowledge to answer you.
here is same manual to remove front bumper
Audi Workshop Manuals
[PREV PAGE] [NEXT PAGE]
A2
Body > General body repairs, exterior > Bumper > Front bumper > Removing and installing front bumper - exploded view
Removing and installing front bumper - exploded view
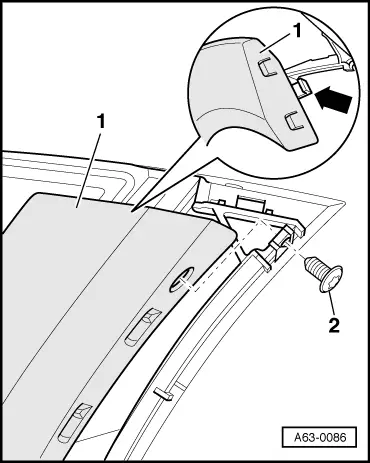
1 - Cover
q Removing:
– Detach wheel housing liner (front)
– Remove self-tapping screws
→ Item and
→ Item.
– Press pins of spreader rivets in so that they engage. Do NOT press in further.
– Do NOT press pin through completely.
– Pull out spreader rivet.
– Unclip sides of cover at left and right from wing panel
→ Fig..
– Detach cover from vehicle towards the front.
2 - Hexagon bolt
q 4 Nm
3 - Reinforcement bar
q Before removing, detach cover
→ Item.
q Unscrew hexagon bolts
→ Item and detach reinforcement bar.
4 - Spreader rivets (5x)
q To remove, do not press locking pins through completely, but only far enough for them to engage.
q Pull out spreader rivet with locking pin.
q If a pin has been pressed through completely, carefully blow it out of reinforcement bar towards the side.
5 - Bolt with washer
q 23 Nm
6 - Cross member
q Before removing, detach cover
→ Item.
q Unscrew hexagon bolt
→ Item and detach cross member.
7 - Self-tapping screws (10x)
q 1.5 Nm
8 - Trim panel for fog lights
q Unclip on inner side of vehicle and detach
→ Fig..
q When installing, slide on at outer side of vehicle and press on at inside.
9 - Self-tapping screw (3x)
q 1.5 Nm
10 - Air intake grille
q Removing
→ Fig..
Unclipping cover from wing panel
– To remove cover -1-, unscrew Torx bolts -2-.
– Release retainer -arrow-, working from engine compartment side. Then push cover out towards the side.
– Detach cover from vehicle towards the front.
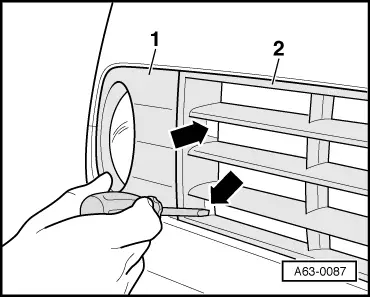
Removing trim for fog light
– Use screwdriver to release retainers -arrows- on trim panel.
– First pull trim panel off on inner side of vehicle, then detach it from cover towards the side.
– When installing, you must hear retainers engage on inner side of vehicle.
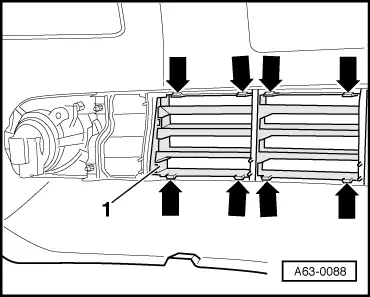
Removing air intake grille
l Side trim panels are removed.
– To remove, press retainers -arrows- together section by section and then detach air intake grille from cover.